How to set up a Garrett AT Pro metal detector In the category Garrett Metal Detectors videos more articles and learn more information about How to set up a Garrett AT Pro metal detector Reviews Price Specifications Features Image manuals videos Accessories All this in metal detectors for gold.

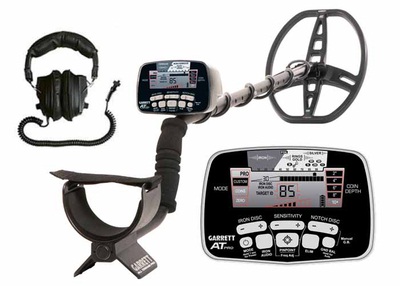
Garrett AT PRO was released in 2010 and has proven itself as a universal search device. Excellent search characteristics on the ground and the ability to dive into the water to a depth of three meters received a lot of enthusiastic reviews. Some diggers compare the metal detector with the younger version of the 350 Ace, but it’s a superficial look – in fact, the detectors have a lot of differences. Let’s talk about setting up At Pro.
Choosing a search mode
Garrett AT Pro operates in six modes: three standard (STD) and three professional (PRO). If you’ve never used this detector, it’s best to try your hand at standard mode. Modes are switched by the MODE button. Three programs are available in standard and professional modes:


Custom – for custom ization by the operator Changes made are saved after the shutdown. Factory mode template is identical to the settings on zero
Coins – for universal search for coins, jewelry; Iron and foil are excluded; Excluded segment of discrimination on foil; Iron discrimination at 35
To find all the metals. No metal objects are ignored; Included are 12 segments of discrimination; Iron discrimination by 0
STD mode is good for beginners or for learning about the features of the device. In this mode, AT Pro releases a full volume binary signal that alerts you to the detection of the target.


Identification is made by signaling the maximum volume of a single ton, regardless of the depth of the location and dimensions of the subject.
In PRO mode, the beep gives more information that can quickly distinguish between two objects close to each other – an ideal solution for littered soils. The Pro Audio beep consists of:
Proportional Audio is proportional to the volume of the signal.
Unveiling the Secrets of the Mighty Garrett AT Pro Metal Detector
fellow treasure hunters! Are you ready to embark on an exciting adventure with the one and only Garrett AT Pro metal detector? Well, saddle up and hold onto your hats because we’re about to dive deep into the incredible world of this magnificent treasure-hunting machine. In this blog post, we’ll uncover the hidden marvels of the Garrett AT Pro, share tips and tricks to maximize your finds, and arm you with everything you need to become a legendary treasure hunter. So let’s giddy up and get started!
Introducing the Garrett AT Pro Metal Detector: A True Game Changer
Garrett AT Pro metal detector is truly a force to be reckoned with. It’s a sophisticated piece of equipment designed to help you hunt for treasure like a pro. With its superior performance and cutting-edge features, this bad boy is ready to take your treasure hunting endeavors to the next level. But what makes the Garrett AT Pro so special? Let’s dig in!
– Waterproof Wonder: The Garrett AT Pro is built to withstand the elements, both on land and underwater. Yep, you heard that right – this powerful machine can accompany you on thrilling aquatic escapades, making it a perfect companion for beachcombing or diving into the depths of rivers and lakes.
– Target Your Treasures: Armed with a fantastic Target ID system, the Garrett AT Pro helps you discern the types of metals your detector encounters. You’ll be able to identify whether it’s gold, silver, iron, or just a pesky soda can, ensuring you dig up only the most precious of finds.
– All-Terrain Warrior: This mighty detector is built for tackling any terrain you throw at it. From rocky mountainsides to grassy plains, the Garrett AT Pro fearlessly ventures where others may falter. Its powerful search coil can penetrate deep into the ground, increasing your chances of unearthing exciting hidden treasures.
– Pro-Level Customization: With a range of adjustable settings, including discrimination, sensitivity, and ground balance, this metal detector lets you fine-tune your hunt to suit your preferences. The Garrett AT Pro ensures that you stay one step ahead of the game and never miss out on those valuable discoveries.

consumer reports best metal detectors for gold
Unleashing the Power of the Garrett AT Pro: Tips and Tricks
Now that you’re acquainted with the might of the Garrett AT Pro, it’s time to learn some tips and tricks to amplify your treasure-hunting success. With these precious nuggets of wisdom, you’ll be well on your way to becoming the envy of the treasure-hunting community.
Stay Grounded with Proper Ground Balancing
Ground balancing is a crucial technique that ensures your metal detector filters out interference from the mineral content in the soil. By eliminating unnecessary chatter, you’ll be able to focus on the sweet sounds of treasure lurking beneath the surface. Remember to calibrate your Garrett AT Pro to the specific ground conditions of your hunting location for optimal performance.
Master the Art of Target Discrimination
Target discrimination is your secret weapon to distinguish between valuable discoveries and mere trash. The Garrett AT Pro offers a wide range of discrimination settings, allowing you to silence signals from undesirable targets while honing in on those precious metals. Play around with the discrimination levels until you strike the perfect balance between filtering out unwanted signals and zeroing in on shiny treasures.

Scout, Scan, and Succeed
Location, location, location! Like a true treasure hunter, you need to scout the right places before unleashing the full potential of your Garrett AT Pro. Research historical sites, old homesteads, parks, beaches, or any area with a rich history of human activity. Remember, the more foot traffic in an area, the higher the chances of stumbling upon hidden gems. So get out there and explore like a true adventurer!
Join the Metal Detecting Community
Don’t embark on this thrilling quest alone – join forces with your fellow treasure hunters! Engage with the vibrant metal detecting community online or in your local area. Share your stories, learn from experienced hunters, and stay up to date on the latest industry trends and tips. Together, we can unlock the secrets of the past and make lifelong friendships along the way.
Set Out on Your Treasure Hunting Expedition Today!
Armed with the knowledge of the mighty Garrett AT Pro metal detector and a pocketful of treasure-hunting wisdom, it’s time to hit the ground running (or swinging, in this case). Remember, the key to unlocking hidden treasures lies not only in your detector but also in your passion, dedication, and thirst for adventure.
So grab your Garrett AT Pro, slip on your treasure-hunting boots, and go forth into the great unknown. Unleash the power within you to unearth untold wonders and create your own stories of legendary finds. Happy hunting, fellow adventurers! May your journey be filled with glittering treasures and unforgettable memories.
Tone Roll Audio Rolling Sound (sound signal with change of tone) – different height of the tonal signal when approaching the object.
So, when setting up the mode you need to understand: two closely spaced objects in STD mode give one signal of the same tonality, and in Pro mode you will hear two signals, and the tone will be different depending on the conductivity of the target.
Set up on the ground
At Pro has an automatic and manual balance of the ground. To automatically adjust, you should press the GND BAL button without letting the button reel up and down in the 2-20 cm range from the ground. The button can only be released after the volume of the signal has been reduced to the minimum value shown in the center of the display. The low value of the construction from the ground corresponds to the conductive soil, high – soil with a large amount of iron.
Manual tuning on the ground is used to get a slightly positive response (a simpler search for coins and other small things) or slightly negative (reducing the influence of hot stones). To manually adjust, you need to press and release the GND BAL button, as well as wiggle the coil in the range of 2-20 cm from the ground. When the tone is low, you need to increase the build-up value with the NOTCHDISC button. When you’re in a high tone, you need to reduce the value of the build-up with the (-) NOTCH DISC button. Once the beep level is reduced to a minimum, you can stop tuning by pressing the GND BAL button again.
Set up the work frequency
AT Pro operates at 15 kHz with the ability to shift – this avoids the impact of interference (when working at power lines, next to other detectors). Here’s what you need to do to set the frequency:
1. Click PINPOINT/Freq Adj
2. Buttons (z) or (-) SENSITIVITY change the frequency to the desired value – when the interference is minimal
3. Selected frequency will appear on the display (F1-F4)
4. Release the PINPOINT button
You need to adjust the frequency when the influence of electrical interference is high. The chosen value only suppresses interference without impacting the depth of detection.
Setting up sound by iron
The abundance of iron debris in the scanned area not only causes false signals, but also masks truly valuable objects. The Iron Audio function allows you to receive a signal from the discriminated iron, which is not audible under normal conditions. As a result, more information about the object, less empty excavations.
This feature is especially good in professional mode. The device reacts to iron objects with an audible signal and forms additional signals of different tonality. Thus, when a nail is detected, the detector emits several short low-pitch signals; The cork from the flat-shaped bottle is characterized by a kind of “low-high-low”.
If you don’t want to go deaf from multiple signals while working in complex and littered soils, it’s best to disable the function of the iron sound display. Turn on Iron Audio if the target gives a vague signal. How is the iron set-up done?
1. Choose STD’s mode.
2. Put a bottle lid on the ground and swipe over it with a coil
3. Switch the metal detector into PRO zero mode and swipe the coil over the cork again.
4. At the beginning and at the end of the goal you will hear a low tone of weak filling – which means that the detector has not been able to accurately determine the type of metal.
5. Set the IRON DISC option at 35, turn on the Iron Audio feature and re-swipe the coil over the subject. A clearly audible low-high-low transition indicates an object with a high probability made of iron.
Setting At Pro for Gold
How can I set up At Pro to find gold and jewelry? This issue is very relevant among gamblers, determined to beat off the cost of a metal detector, or among specialists of a narrow profile, working mainly on gold.
Tests show that if a gold object is detected, the display will display a 39-50 VDI number and show segments of the discrimination scale from 8 to 11. However, this does not mean that you have found gold.
The fact is that all detectors determine the type of metal by its conductivity, which depends on the size and weight of the target. Small objects are usually well defined, but large (axes, ploughs, buckets) rarely get into their sector, and tend closer to silver, copper. If you get confused in guesses – determine the size of the target by swinging the coil. Now it’s time to set up a metal detector for gold:
1. Use the ground balance function. Gold most often lies in difficult soils, on the banks of rivers and lakes. To avoid false signals, set up the ground. Set up in values from 0 to 20.
2. Expose the maximum sensitivity – the higher its value, the higher the chances of discovering even the smallest particles of gold that will lead you to real treasures.
3. When searching on the beach do not exclude from the search for tongues from cans, foil, corks – so you can miss the jewelry.
So, you learned about setting up AT Pro, then it’s about experience. Carefully study the instructions and create your own masks of discrimination. For each type of search, the device will be set up in a different way. To search at depth is well suited low level of sensitivity, at a high level well are small objects and gold. Use the ground balance and adjust the frequency to avoid false signals – and very soon you will be working with a metal detector as a whole.


Related Articles
- Rare coins is one of the few investments
- metal detectors for gold and silver
- Garrett Magnascanner Cs 5000 Metal Detector Review
- super scanner v garrett
- metal detector gold 3d
- Why investing in gold is called a wise investment?
- CoinFinder (CF77) – 17.5kHz
- vr 3000 gold detector
- Tips for self-installing CCTV
- XP DEUS Metal Detector wireless world sensation
